


Cisco ISE specifications:
| Sr. | Image Name | Version | File | Supported | Download |
| 1 | ISE\ise-2.6.0.156.SPA.x86_64.iso | 2.6.0.156 | ISO | EVE-NG VMware- Workstation Server | Download |
Download the ISE image from below link
How to add ISE in EVE-NG
1. Login in EVE via SSH and Create ISE image folder in the EVE.
mkdir /opt/unetlab/addons/qemu/ise-2.6.0.156/
2. Using WinSCP / FileZilla via SCP or SSH connect to your EVE and upload ise-2.6.0.156.SPA.x86_64.iso file to this directory.
3. From EVE CLI go to newly created ISE folder and rename uploaded ISO file to cdrom.iso.
cd /opt/unetlab/addons/qemu/ise-2.6.0.156/
mv ise-2.6.0.156.SPA.x86_64.iso cdrom.iso
4. Create virtio HDD for ISE
/opt/qemu/bin/qemu-img create -f qcow2 hda.qcow2 200G
5. Create new LAB in the EVE and add ISE node, connect it to Home Management cloud (Cloud0). Settings for ISE node are: CPU x4, RAM x16384M, 1 xEthernet. Console VNC, during install first time.
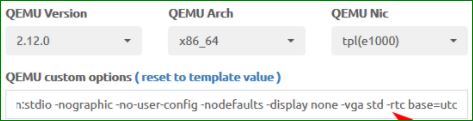
Qemu line in Imge edit:
-machine type=pc,accel=kvm -smbios type=1,product=KVM -serial mon:stdio -nographic -no-user-config -nodefaults -display none -vga std -rtc base=utc

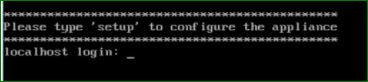
6. Start ISE node and when setup prompt appears, shutdown ISE node.

7. Check lab ID number on EVE side bar “Lab details”, For Example:

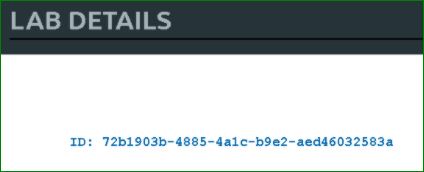
8. EVE CLI: Convert image from lab tmp folder to defaults image location. In the command below is used lab ID (above) and as we added on lab single node, node ID is 1. ISE image foldername match what we created before. Number 0 in the line below is user POD number. Admin pod is 0.
cd /opt/unetlab/tmp/0/72b1903b-4885-4a1c-b9e2-aed46032583a/1/
qemu-img commit hda.qcow2
9. Delete install CD ISO from image folder:
rm -f /opt/unetlab/addons/qemu/ise-2.6.0.156/cdrom.iso
10. Do Fix permissions:
/opt/unetlab/wrappers/unl_wrapper -a fixpermissions
Advanced instructions on how to make your image smaller in size (sparsify&compress). RECOMMENDED !
- After done all the steps above and default image is created, you can compress its HDD and make it smaller.
IMPORTANT: for compressing an image you must have sufficient free space on your EVE host, free space must exceed the total space (200GB in this example, We created 200Gb virtio HDD for ISE) of the HDD you plan to shrink. The space needed can vary but will be the total space of the disk to be shrunk plus the size of the final sparsified and compressed image. To be safe you should have double the size of the HDD you want to shrink as free space on your EVE host. In our example we needed 200GB +GB of free HDD space. Once this process is done, the temporary file(s) will be deleted and free space reclaimed.
- From the CLI: go to your ISE image directory:
cd /opt/unetlab/addons/qemu/ise-2.6.0.156/
perform the sparsify command:
virt-sparsify --compress hda.qcow2 compressedhda.qcow2
- It can take some time and another compressed image will be created in the same image directory
- now you can rename original hda.qcow2 file to orig.qcow2
mv hda.qcow2 orig.qcow2
- Rename the compressed image name to hda.qcow2:
mv compressedhda.qcow2 hda.qcow2
- now you can test your new compressed image on a lab, just wipe the node and start it.
- If the compressed node works fine, you can delete your original source image:
You can also visit on eve-ng site, if you are facing any issue.