
Today, No one in network field who is not aware from nexus or he is not having knowledge/experience on nexus devices. Most of datacenters have been converted on nexus devices or coverted in cloud. If we are talking on nexus then 2k , 5k ,7k and 9k are more popular devices. Here nexus 9k is heigher level device and having many advance features like ACI. I think , We all are aware from nexus and its features. So lets start how to add cisco nexus 9k switch in eve-ng.
If you want to install nexus 5k then you can also read the below post:
Note: Naming conversation is very important in eve-ng. So please be careful with folder name and file name. I have given multiple 9k images in download link. So make sure you are using the same file name in commands which you want to use and uploaded in eve-ng.
1. Download the Nexus 9K image from above link
Note: We are just providing the links to download the images for education/practice purpose .These images are not hosted at networkrare.com
2. Run the VMware
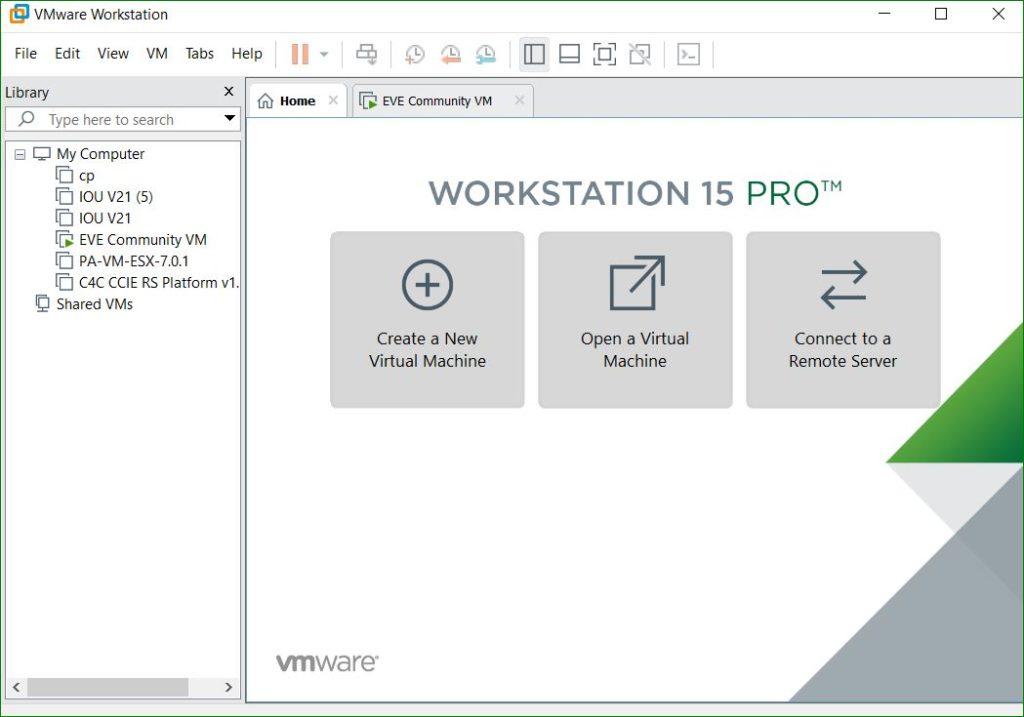
3. Start the eve-ng
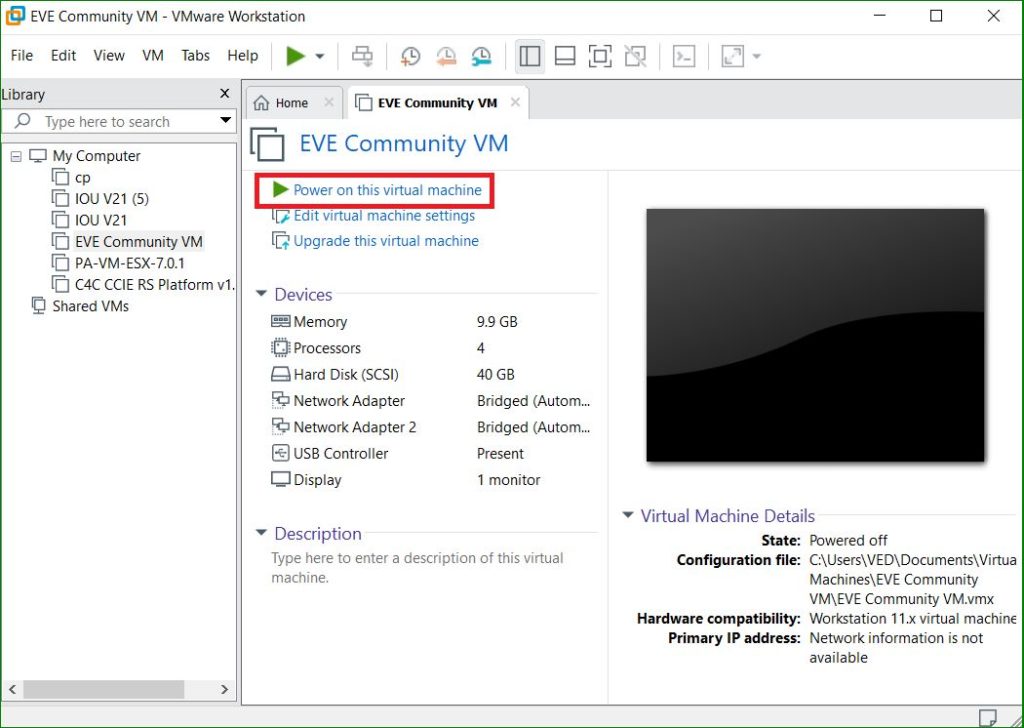
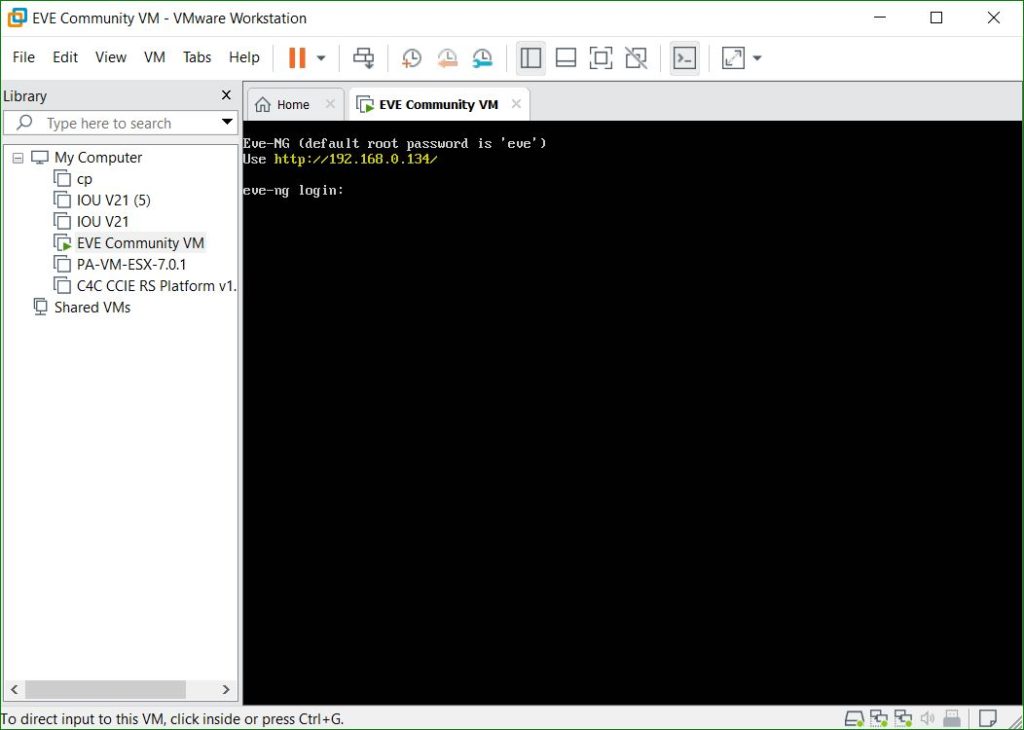
4. Access the eve-ng using SSH
Userbname: root
Password: eve

5. Create a directory with the name nxosv9k-7.0.3.I7.3 using below command or you can create the folder using Winscp.
mkdir /opt/unetlab/addons/qemu/nxosv9k-7.0.3.I7.3/
6. Login in WinSCP or FileZilla
Userbname: root
password: eve
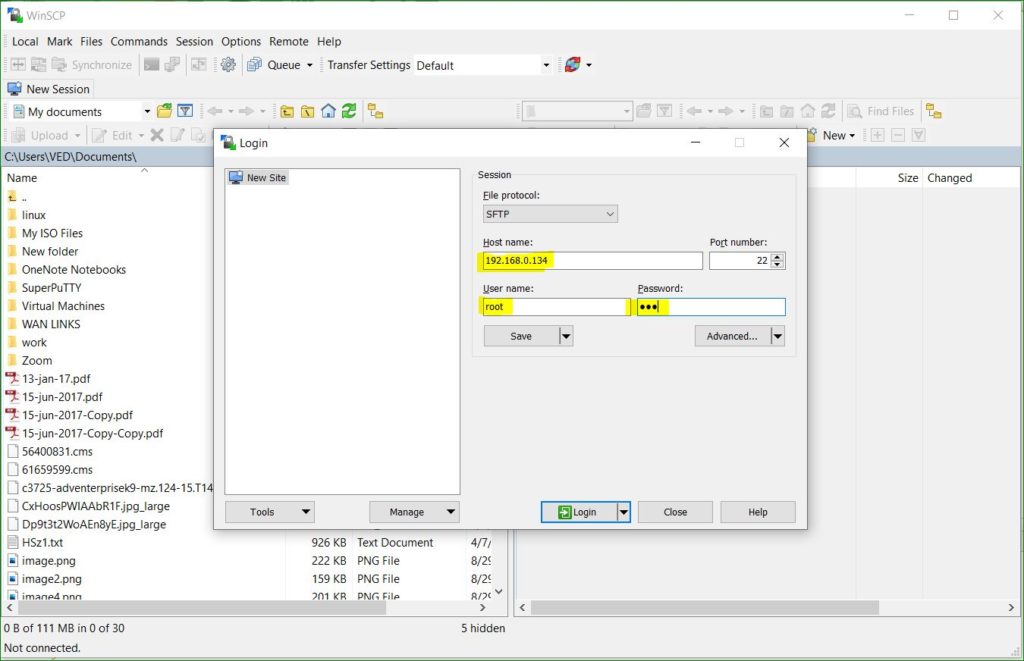
7. Upload the nexus image in this folder using WinSCP or FileZilla
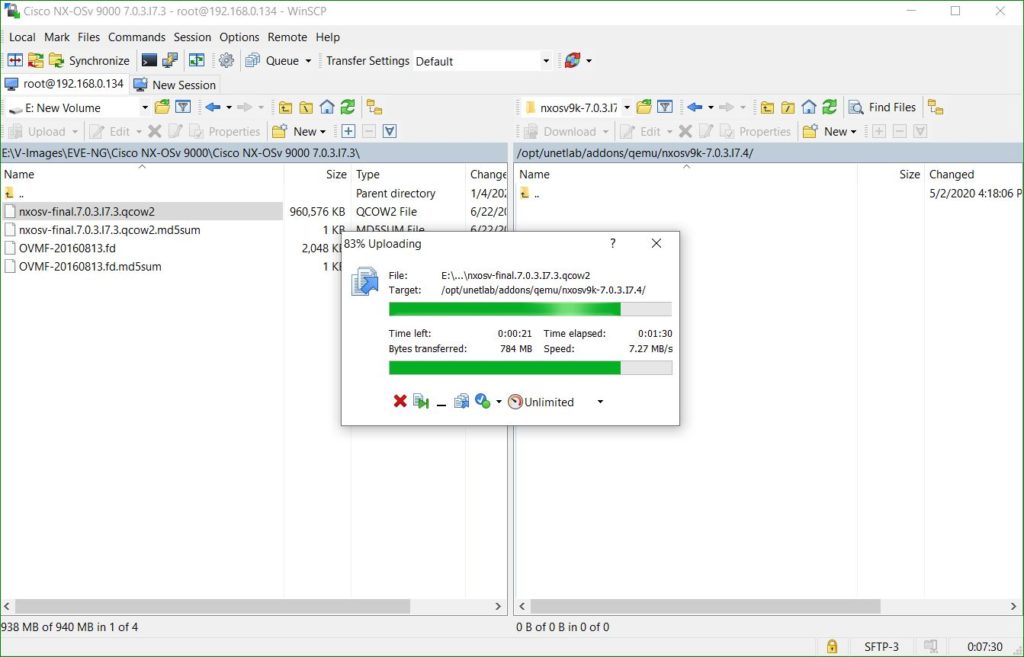
8. Enter in Directory using below command (eve-ng ssh session)
cd /opt/unetlab/addons/qemu/nxosv9k-7.0.3.I7.4/9. Rename image to Sataa.qcow2
mv nxosv-final.7.0.3.I7.3.qcow2 sataa.qcow210. Fix permissions in eve-ng by running below command
/opt/unetlab/wrappers/unl_wrapper -a fixpermissions
11. Open the eve-ng in browser using below credentials
Username: admin
Password: eve
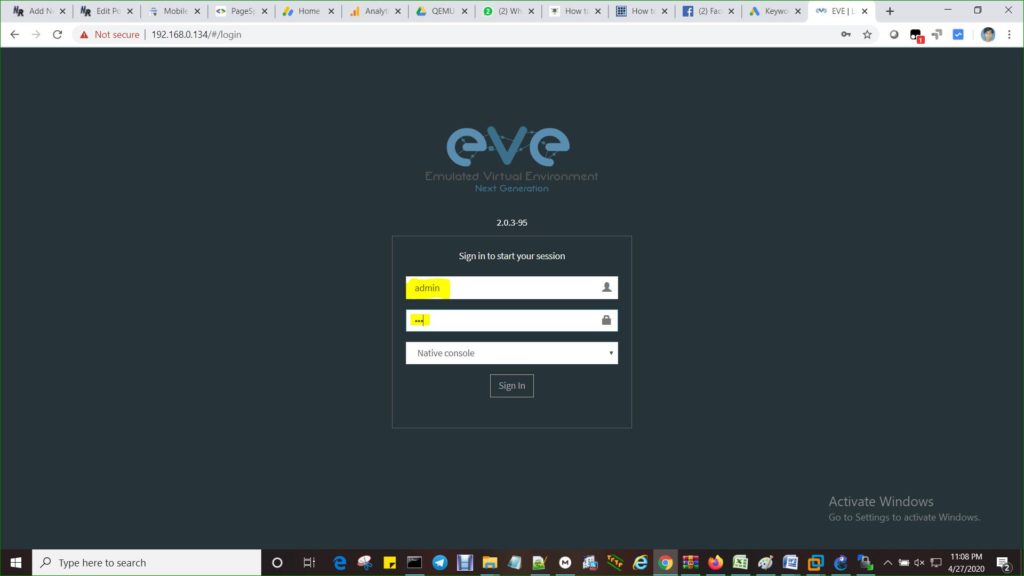
Select the nexus 9k from nodes and add it in lab
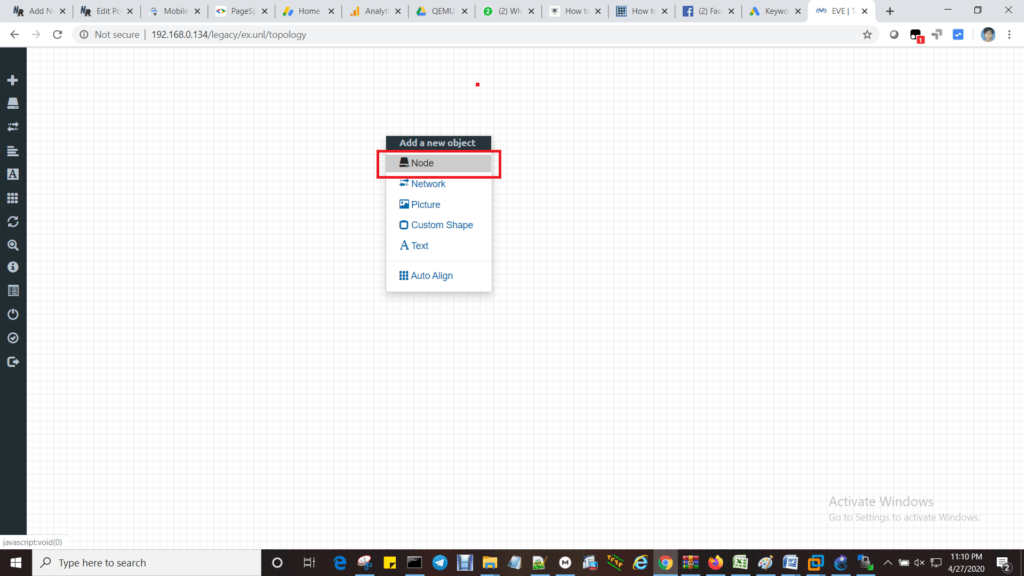
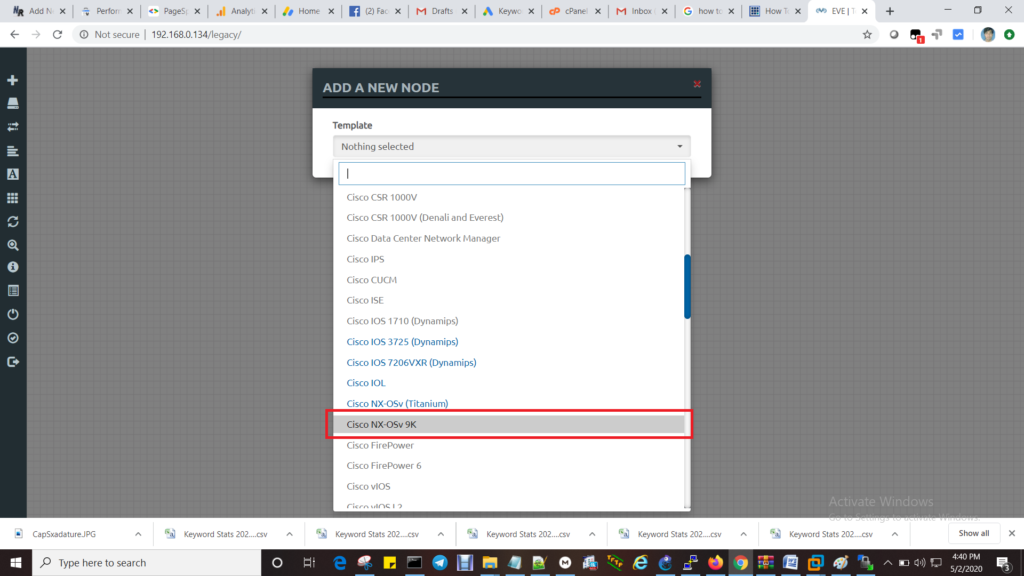

Start the nexus 9K (It can take more time , depends on RAM and CPU)

After first boot , Nexus 9K switch will bring in loader mode

Run the dir command to see all the files

Finds the file (nxos.7.0.3.I7.4.bin) from list and copy it
Run the below command to load the NX-OS (It can also take more time because file size is under 1GB , So time will depend on RAM and CPU)
loader > boot nxos.7.0.3.I7.3.bin

Once NX-OS loaded , give the below answers
Abort Auto Provisioning and continue with normal setup ?(yes/no)[n]: yes
Do you want to enforce secure password standard (yes/no) no

Enter passwords for admin:
admin
admin@123
Would you like to enter the basic configuration dialog (yes/no): no
Do login in nexus 9k switch when first time using below credential
User Access Verification
 login: admin
Password: admin@123
Run the dir flash: command to see nx-os file name as below
switch# dir bootflash:
       4096    Apr 18 00:53:27 2017  .rpmstore/
       4096    Apr 18 00:53:47 2017  .swtam/
      14160    Apr 18 00:58:45 2017  20170418_005603_poap_26331_init.log
  757307904    Feb 16 17:17:14 2017  nxos.7.0.3.I7.3.bin
          0    Apr 18 01:00:14 2017  platform-sdk.cmd
       4096    Apr 18 00:55:47 2017  scripts/
       4096    Apr 18 00:55:57 2017  virt_strg_pool_bf_vdc_1/
       4096    Apr 18 00:54:00 2017  virtual-instance/
         59    Apr 18 00:53:52 2017  virtual-instance.conf
Enter into global configuration mode of switch.
switch# conf t
Enter configuration commands, one per line. End with CNTL/Z.
Set the boot sequence using below command
switch(config)# boot nxos bootflash:nxos.7.0.3.I7.3.bin
end
Save the configuration using below command
switch# copy run start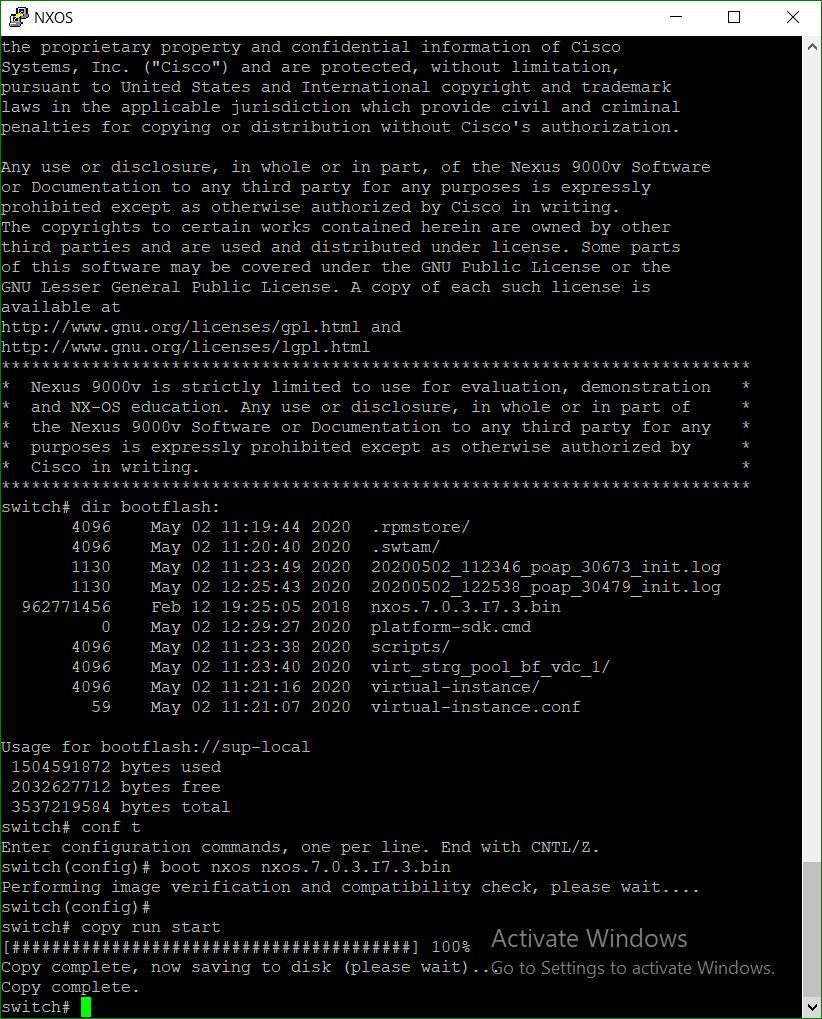
Restart the switch (After reload the switch , it will work normally)
Note:
Below steps are required every time when we are adding the Nexus 9k in topology first time.
1. Once NX-OS loaded , give the below answers
Abort Auto Provisioning and continue with normal setup ?(yes/no)[n]: yes
Do you want to enforce secure password standard (yes/no) no

Enter passwords for admin:
admin
admin@123
Would you like to enter the basic configuration dialog (yes/no): no
2. Do login in nexus 9k switch first time using below credential
  User Access Verification
    login: admin
    Password: admin@123
3. Run the dir flash: command to see nx-os file name as below
switch# dir bootflash:
       4096    Apr 18 00:53:27 2017  .rpmstore/
       4096    Apr 18 00:53:47 2017  .swtam/
      14160    Apr 18 00:58:45 2017  20170418_005603_poap_26331_init.log
  757307904    Feb 16 17:17:14 2017  nxos.7.0.3.I7.3.bin
          0    Apr 18 01:00:14 2017  platform-sdk.cmd
       4096    Apr 18 00:55:47 2017  scripts/
       4096    Apr 18 00:55:57 2017  virt_strg_pool_bf_vdc_1/
       4096    Apr 18 00:54:00 2017  virtual-instance/
         59    Apr 18 00:53:52 2017  virtual-instance.conf
4. Enter into global configuration mode of switch.
switch# conf t
Enter configuration commands, one per line. End with CNTL/Z.
5. Set the boot sequence using below command
switch(config)# boot nxos bootflash:nxos.7.0.3.I7.3.bin
end
6. Save the configuration using below command
switch# copy run startDetailed logs (It can be useful if you are still facing the issue with nexus 9k)
loader > dir
Setting listing for bootflash:
Number of devices detected by BIOS is 1
Number of devices detected by BIOS is 1
Number of devices detected by BIOS is 1
Going to print files for device bootflash: 1
 .rpmstore
 nxos.7.0.3.I7.3.bin
 .swtam
 virtual-instance
 virtual-instance.conf
 virt_strg_pool_bf_vdc_1
 scripts
 20200502_112346_poap_30673_init.log
 sysmgrLcore_0x101_pixm_vl_log.27280.tar.gz
Number of devices detected by BIOS is 1
Number of devices detected by BIOS is 1
Number of devices detected by BIOS is 1
Clearing listing for bootflash:

loader > boot nxos.7.0.3.I7.3.bin
Booting nxos.7.0.3.I7.3.bin
Trying diskboot
dev_str: bootflash: partition_str: 3 filename_str /nxos.7.0.3.I7.3.bin
command = root (hd0,3)
 Filesystem type is ext2fs, partition type 0x83
Formed cmdline  console=ttyS0,115200n8nn  loader_ver="5.01.0"  quiet debug
Formed cmdline  console=ttyS0,115200n8nn  loader_ver="5.01.0"  quiet debug  ksimg=nxos.7.0.3.I7.3.bin  card_index=21099 dummy_sprom swiotlb=48000
Booting kickstart image: bootflash::3:/nxos.7.0.3.I7.3.bin....
Number of devices detected by BIOS is 1
NBI header
magic: 1b031336, len: 54, location: 94400000 (bx=0, ds=9440), exec addr: 92800000 16 16

segment header
length: 4, vendor: 11 flags: 0, loadaddr: 94000, image len: 200, memory length: 400
Reading data for kernel param. Len 512
Cmd line:  console=ttyS0,115200n8nn  loader_ver="5.01.0"  quiet debug  ksimg=nxos.7.0.3.I7.3.bin  card_index=21099 dummy_sprom swiotlb=48000 rw root=/dev/ram0 rdbase=0x8000000 ip=off ramdisk_size=131072 panic=5 quiet coredump_filter=0xb mtdparts=physmap-flash.0:256k(RR_LOG),512k(mtdoops),16M(plog),16M(trace) intel_idle.max_cstate=2 pcie_ports=native nopat slub_debug=- cpuidle.off=1

segment header
length: 4, vendor: 14 flags: 0, loadaddr: 100000, image len: 543e00, memory length: 800000
Loading kernel length 5520896
file_size 5520896 real_size 4470 prot_kernel_size 5505024 setupsects 30
x86_64/loader/linux.c:102: real_size = 2000, prot_size = 540000, mmap_size = 720
x86_64/loader/linux.c:133: physical_start = 1000, physical_end = 9f000
x86_64/loader/linux.c:146: trying to allocate 2 pages at 9d000
Trying to allocate 1344 pages for VMLINUZ
Allocated prot_mode_mem 0xbd2b0000 real_mode_mem 0x0009d000
[Linux-EFI, setup=0x1176, size=0x540000]

segment header
length: 14, vendor: 15 flags: 0, loadaddr: a44000, image len: 390e7000, memory length: 10000000
Loading intird 957247488
x86_64/loader/linux.c:573: initrd_pages: 233703
x86_64/loader/linux.c:584: addr_min: 0x0 addr_max: 0x7ffff000 mmap_size: 1872
x86_64/loader/linux.c:603: desc = {type=7,ps=0x1000,vs=0x0,sz=156,attr=15}
x86_64/loader/linux.c:603: desc = {type=7,ps=0x100000,vs=0x0,sz=1792,attr=15}
x86_64/loader/linux.c:603: desc = {type=7,ps=0x808000,vs=0x0,sz=8,attr=15}
x86_64/loader/linux.c:603: desc = {type=7,ps=0x818000,vs=0x0,sz=8,attr=15}
x86_64/loader/linux.c:603: desc = {type=7,ps=0x1300000,vs=0x0,sz=518141,attr=15}
x86_64/loader/linux.c:603: desc = {type=7,ps=0x80000000,vs=0x0,sz=245054,attr=15}
x86_64/loader/linux.c:603: desc = {type=7,ps=0xbbd5e000,vs=0x0,sz=5458,attr=15}
x86_64/loader/linux.c:603: desc = {type=7,ps=0xbd86d000,vs=0x0,sz=121,attr=15}
x86_64/loader/linux.c:603: desc = {type=7,ps=0xbf8d5000,vs=0x0,sz=2,attr=15}
x86_64/loader/linux.c:603: desc = {type=7,ps=0xbfd70000,vs=0x0,sz=16,attr=15}
x86_64/loader/linux.c:603: desc = {type=7,ps=0x100000000,vs=0x0,sz=1310720,attr=15}

Loading [912M/912M]
   [Initrd, addr=0x46a16000, size=0x390e7000]

segment header
length: 4, vendor: 16 flags: 4, loadaddr: 2500000, image len: 800, memory length: 800
Reading data for vendor seg. Length 2048
Leaving grub land

image length read 962771456

image hash: abdb32fb fffab2d1 eb96a4c0 44e00c9d
[   90.904467] [1588422094] Error: Could not find mtd devices
y
Installing klm_card_index
done
Linking n9k flash devices
INIT: version 2.88 booting
Installing ata_piix module ... done.
Unsquashing rootfs ...
Installing isan procfs ... done.
Installing SSE module with card index 21099 ... done.
Creating SSE device node 246 ... done.
Loading I2C driver ... done.
Installing CCTRL driver for card_type 29 on a VM without NEED_GEM ... done.
147.32: Interrupt throttling disabled. No cctrl irq detected.
Loading IGB driver ... done.
Not Micron SSD...

Checking all filesystems.Warning: switch is starting up with default configuration

Installing SPROM driver ... IS_N9K done.
Installing pfmsvcs module with SPROM card index 21099 ... done.
Installing nvram module ... done.
Installing if_index module with port mode 6 ... done.
Installing fcfwd
Installing RNI lcnd ... done
Installing LC netdev ... done
Installing psdev module ... done.
Installing veobc module ... done.
Inserting eMMC module ...
Inserting OBFL module ... done.
Making OBFL character devices
mounting plog for N9k!
Trying to mount cdrom...
exit code: 1
Starting OpenBSD Secure Shell server: sshd ... done.
tune2fs 1.42.1 (17-Feb-2012)
Setting reserved blocks percentage to 0% (0 blocks)
Starting portmap daemon...
creating NFS state directory: done
starting 8 nfsd kernel threads: done
starting mountd: done
starting statd: done
Saving image for img-sync ...
Loading system software
Installing local RPMS
Patch Repository Setup completed successfully
Creating /dev/mcelog
Starting mcelog daemon
Overwriting dme stub lib
File /etc/shared/localtime does not exist.
INIT: Entering runlevel: 3
Running S93thirdparty-script...

Populating conf files for hybrid sysmgr ...
Starting hybrid sysmgr ...
Installing FC2 module using inband eth0 vegas 8 fc2_dom_family 25 ...done
found complete tar.gz bundle calling start_bundle_restore
inserting /isan/lib/modules/klm_cisco_nb.o ... done
Executing Prune clis.
2020 May  2 12:23:42  %$ VDC-1 %$ %USER-0-SYSTEM_MSG:  before access to bkout_cfg  - clis
2020 May  2 12:23:43  %$ VDC-1 %$ May  2 12:23:43 %KERN-0-SYSTEM_MSG: [   90.904467] [1588422094] Error: Could not find mtd devices  - kernel
2020 May  2 12:23:46  %$ VDC-1 %$  %USER-2-SYSTEM_MSG: <<%USBHSD-2-MOUNT>> logflash: online  - usbhsd
y
2020 May  2 12:23:59  %$ VDC-1 %$ netstack: Registration with cli server complete
System is coming up ... Please wait ...
2020 May  2 12:24:38  %$ VDC-1 %$ %USER-2-SYSTEM_MSG: ssnmgr_app_init called on ssnmgr up - aclmgr
y.
.2020 May  2 12:24:46  %$ VDC-1 %$ %USER-0-SYSTEM_MSG: end of default policer - copp
2020 May  2 12:24:46  %$ VDC-1 %$ %COPP-2-COPP_NO_POLICY: Control-plane is unprotected.
y
..2020 May  2 12:25:00  %$ VDC-1 %$ %CARDCLIENT-2-FPGA_BOOT_GOLDEN: IOFPGA booted from Golden
2020 May  2 12:25:00  %$ VDC-1 %$ %CARDCLIENT-2-FPGA_BOOT_STATUS: Unable to retrieve MIFPGA boot status
ySystem is coming up ... Please wait ...

....System is coming up ... Please wait ...
2020 May  2 12:25:32  %$ VDC-1 %$ %VDC_MGR-2-VDC_ONLINE: vdc 1 has come online
.Starting Auto Provisioning ...
y2020 May  2 12:25:37 switch %$ VDC-1 %$ %USER-1-SYSTEM_MSG: SWINIT failed. devid:241 inst:0  - t2usd
y
Done

Abort Power On Auto Provisioning [yes - continue with normal setup, skip - bypass password and basic configuration, no - continue with Power On Auto Provisioning] (yes/skip/no)[no]: y
Disabling POAP.......2020 May  2 12:25:38 switch %$ VDC-1 %$ %POAP-2-POAP_INITED: [953F37YHRR9-50:00:00:01:00:07] - POAP process initialized
y
Disabling POAP


         ---- System Admin Account Setup ----


Do you want to enforce secure password standard (yes/no) [y]: y

  Enter the password for "admin": 2020 May  2 12:25:47 switch %$ VDC-1 %$ %VMAN-2-ACTIVATION_STATE: Successfully activated virtual service 'guestshell+'
2020 May  2 12:25:47 switch %$ VDC-1 %$ %VMAN-2-GUESTSHELL_ENABLED: The guest shell has been enabled. The command 'guestshell' may be used to access it, 'guestshell destroy' to remove it.

    Wrong Password, Reason:
       [Length should be at least 8 characters]
    Invalid admin password.

    Enter the password for "admin":
    Wrong Password, Reason:
       [Length should be at least 8 characters]
    Invalid admin password.

    Enter the password for "admin":
    Wrong Password, Reason:
       [Length should be at least 8 characters]
    Invalid admin password.

    Enter the password for "admin":
    Wrong Password, Reason:
       [Length should be at least 8 characters]
    Invalid admin password.

    Enter the password for "admin":
    Wrong Password, Reason:
       [Length should be at least 8 characters]
    Invalid admin password.

    Enter the password for "admin": 2020 May  2 12:26:40 switch %$ VDC-1 %$ %ASCII-CFG-2-CONF_CONTROL: System ready

    Wrong Password, Reason:
       [Length should be at least 8 characters]
    Invalid admin password.

    Enter the password for "admin":
    Wrong Password, Reason:
       [Length should be at least 8 characters]
    Invalid admin password.

    Enter the password for "admin":
    Wrong Password, Reason:
       [Length should be at least 8 characters]
    Invalid admin password.

    Enter the password for "admin":
  Confirm the password for "admin":

         ---- Basic System Configuration Dialog VDC: 1 ----

This setup utility will guide you through the basic configuration of
the system. Setup configures only enough connectivity for management
of the system.

Please register Cisco Nexus9000 Family devices promptly with your
supplier. Failure to register may affect response times for initial
service calls. Nexus9000 devices must be registered to receive
entitled support services.

Press Enter at anytime to skip a dialog. Use ctrl-c at anytime
to skip the remaining dialogs.

 Would you like to enter the basic configuration dialog (yes/no): no

2020 May  2 12:28:44 switch %$ VDC-1 %$ %ACLQOS-SLOT1-2-ACLQOS_FAILED: ACLQOS failure: TCAM region is not configured for feature QoS class IPv4 direction ingress. Please configure TCAM region Ingress COPP [copp] and retry the command.

Error: There was an error executing atleast one of the command
Please verify the following log for the command execution errors.
TCAM region is not configured. Please configure TCAM region and retry the command


User Access Verification
 login: admin
Password:
Login incorrect

User Access Verification
login: admin@123
Password:
Login incorrect

User Access Verification
login: admin
Password:

Cisco NX-OS Software
Copyright (c) 2002-2018, Cisco Systems, Inc. All rights reserved.
Nexus 9000v software ("Nexus 9000v Software") and related documentation,
files or other reference materials ("Documentation") are
the proprietary property and confidential information of Cisco
Systems, Inc. ("Cisco") and are protected, without limitation,
pursuant to United States and International copyright and trademark
laws in the applicable jurisdiction which provide civil and criminal
penalties for copying or distribution without Cisco's authorization.

Any use or disclosure, in whole or in part, of the Nexus 9000v Software
or Documentation to any third party for any purposes is expressly
prohibited except as otherwise authorized by Cisco in writing.
The copyrights to certain works contained herein are owned by other
third parties and are used and distributed under license. Some parts
of this software may be covered under the GNU Public License or the
GNU Lesser General Public License. A copy of each such license is
available at
http://www.gnu.org/licenses/gpl.html and
http://www.gnu.org/licenses/lgpl.html
***************************************************************************
*  Nexus 9000v is strictly limited to use for evaluation, demonstration   *
*  and NX-OS education. Any use or disclosure, in whole or in part of     *
*  the Nexus 9000v Software or Documentation to any third party for any   *
*  purposes is expressly prohibited except as otherwise authorized by     *
*  Cisco in writing.                                                      *
***************************************************************************
switch#
How To Add Cisco Nexus 9k Switch in Eve-ng
It’s hard to find educated people in this particular subject, but you sound like you know what you’re talking about! Thanks|