HSRP (Hot Standby Router Protocol) is a cisco proprietary protocol. it is used for default gateway redundancy. It elects one router as active and one router as standby and puts all other routers in listen HSRP state.
Active router is used as default gateway for hosts. It receives the ARP request from all the hosts and replies with HSRP virtual MAC address.
All host sends the traffic to HSRP active router and active router forwards out to up-links . If active router fails then standby router takes the active role immediately and one router from HSRP listen state takes the standby role. Active router failure detects using hello messages , three hello missed from active router then standby router will assume that active router is down and it will take the active role.
Active and standby selection is based on HSRP priority. A router with highest HSRP priority elects as an active and second one as standby and all other router moves in HSRP listen state. default HSRP priority is 100 and can be set from 1 to 255. if priority is same then highest router ID will be use as tie breaker.
Remediable Ponits:
- HSRP(version–1) multicast IP address is 224.0.0.2
- HSRP(version–2) Multicast IP address is 224.0.0.102
- HSRP(version–1)virtual MAC address is 0000.0c07.acXX (X=group number)
- HSRP(version–2)virtual MAC address is 0000.0c9f.fXXX (X=group number)
- HSRP uses UDP port number 1985.
- With HSRP version 1,Group number can be define using value from 1-255
- With HSRP version 2, Group number can be define using value from 1-4095.
HSRP States:
- Disable – HSRP is disable in this state.
- Initial – This state occurs , just after configure the HSRP.
- Listen – In this state , router listens the hello packets from other HSRP routers.
- Speak – In this state , router sends the HSRP hello packets as well as joins the active / standby election
- Standby – In this state , router listens the hello packets and take over the active role is HSRP active router fails.
- Active – In this state , router receives the packets from hosts and forwards them.
Preempt:
Preempt allows a router to immediately take over the active role , If it has highest priority. We can also use two timers with preempt : Minimum and Reload.
- Minimum – It forces the router to wait. so interfaces come up and HSRP can be synchronized before new router take the active role. It can be set from 0 to 3600 seconds.
- Reload – This timer is useful , when a router is having highest HSRP priority and rebooted. This timer provides the time for routing protocol synchronization. So packet drop can be reduce which can be drop due to routing. It can be set from 0 to 3600 seconds.
Switch(config-if)# standby 1 preempt delay 60 60Syntax:
Switch(config-if)# standby 1 preempt delay minimum_time reload_timeHSRP Authentication:
HSRP supports the both plain text authentication and MD5 authentication.
Plain Text – With this method , router sends the HSRP password key string in plain text and it can be 8 characters long.
Switch(config-if)# standby 1 authentication Cisco@1234Md5 (Message – Digest 5) – With this method , router send the HSRP password in encrypted format and password key string can be 64 characters long.we can also configure multiple key strings using key chain feature.
Switch(config-if)# standby 1 authentication md5 key-string 1 Cisco@1234Key chain example:
Switch(config)# key chain ABC
Switch(config-keychain)# key 2
Switch(config-keychain-key)# key-string 1 Cisco@1234
Switch(config)# interface f0/0
Switch(config-if)# standby 1 authentication md5 key-chain ABC
Hello Timer:
It specifies the interval between hello messages. default hello interval is 3 seconds and it can be set from 1 to 255 or 15 to 999 milliseconds.
Switch(config-if)@ standby 1 timers 3 10Syntax:
Switch(config-if)@ standby 1 timers hello_timer hold-timerHold Timer:
It specifies that how long a router will wait for listen a hello message before assume the router as dead. default hold interval is 10 seconds and it can be set from 3 to 255 seconds or 50 to 3000 milliseconds.
Switch(config-if)@ standby 1 timers 3 10Interface Tracking / Object Tracking
HSRP supports the both interface and object tracking. it useful when we are having multiple up-links. We can configure interface tracking and define the decrement value. so if a interface went down then HSRP priority will be decrease by that value. if interface comes up then HSRP priority value will be increase. It helps to move the HSRP role on a router which is having more active up-links. Default decrement value is 10.
Switch(config-if)# standby 1 track f0/1 20Object tracking is also works same. but with object tracking we can track an object like we can track a protocol or ICMP.
Example of object tracking
Switch(config)# ip sla 1
Switch(config-ip-sla)# icmp-echo 192.168.14.4
Switch(config)# ip sla shedule 1 start-time new life forever
Switch(config)# trach 1 rtr 1 rechability
Switch(config)# interface f0/1
Switch(config-if)# standby 1 track 1 decrements 60
Example:
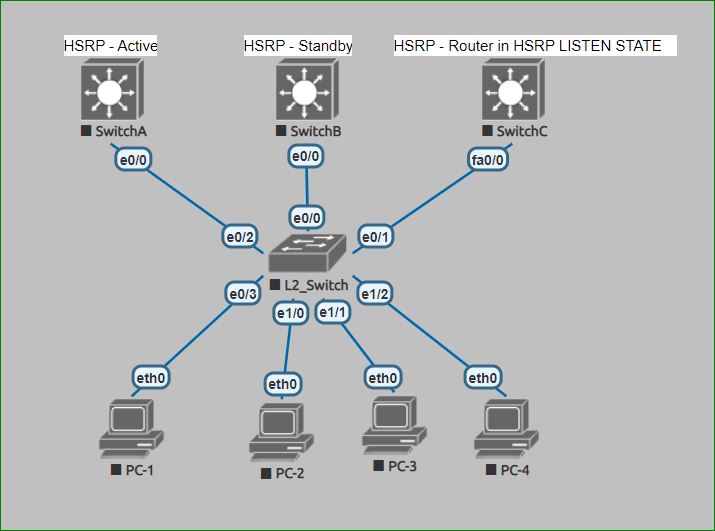
SwitchA(config)# interface vlan 50
SwitchA(config-if)# ip address 192.168.2.10 255.255.255.0
SwitchA(config-if)# standby 1 priority 200
SwitchA(config-if)# standby 1 preempt
SwitchA(config-if)# standby 1 ip 192.168.2.1
SwitchB(config)# interface vlan 50
SwitchB(config-if)# ip address 192.168.2.11 255.255.255.0
SwitchB(config-if)# standby 1 priority 150
SwitchB(config-if)# standby 1 preempt
SwitchB(config-if)# standby 1 ip 192.168.2.1SwitchC(config)# interface vlan 50
SwitchC(config-if)# ip address 192.168.2.12 255.255.255.0
SwitchC(config-if)# standby 1 priority 100
SwitchC(config-if)# standby 1 preempt
SwitchC(config-if)# standby 1 ip 192.168.2.1Load Balancing
Load balancing with HSRP or VRRP is a trick of multiple groups. We can use Switch A as active in group 1 and Switch B as active for group 2 , using HSRP priority. Below is the example of load balancing using multiple groups , we are using the same topology:
SwitchA(config)# interface vlan 50
SwitchA(config-if)# ip address 192.168.2.10 255.255.255.0
SwitchA(config-if)# standby 1 priority 200
SwitchA(config-if)# standby 1 preempt
SwitchA(config-if)# standby 1 ip 192.168.2.1
SwitchA(config-if)# standby 2 priority 150
SwitchA(config-if)# standby 2 preempt
SwitchA(config-if)# standby 2 ip 192.168.2.2
SwitchB(config)# interface vlan 50
SwitchB(config-if)# ip address 192.168.2.11 255.255.255.0
SwitchB(config-if)# standby 1 priority 150
SwitchB(config-if)# standby 1 preempt
SwitchB(config-if)# standby 1 ip 192.168.2.1
SwitchB(config-if)# standby 2 priority 200
SwitchB(config-if)# standby 2 preempt
SwitchB(config-if)# standby 2 ip 192.168.2.2SwitchC(config)# interface vlan 50
SwitchC(config-if)# ip address 192.168.2.12 255.255.255.0
SwitchC(config-if)# standby 1 preempt
SwitchC(config-if)# standby 1 ip 192.168.2.1
SwitchC(config-if)# standby 2 preempt
SwitchC(config-if)# standby 2 ip 192.168.2.2Show Commands
Switch# Show standby vlan 50 brief
Switch# Show standby vlan 50
Switch# Show standby brief
Switch# Show standby |  in priority
Switch# Show standby | in time
Debug Commands
Switch# debug standby eventsThanks For reading …………………
We will recommend you to read below posts: